Tuesday, May 17, 2011

Contacts API 2.0 and above | Android Developer Tutorial


Starting from Android 2.0 (API Level 5), the Android platform provides an improved Contacts API for managing and integrating contacts from multiple accounts and from other data sources. To handle overlapping data from multiple sources, the contacts content provider aggregates similar contacts and presents them to users as a single entity. This article describes how to use the new API to manage (insert, update, delete, view) contacts.

The new Contacts API is defined in the android.provider.ContactsContract and related classes. The older API is still supported, although deprecated.

We need to understand the underlying structure of storage to better manipulate the contacts. We have three distinct types of tables – Contacts, Raw Contacts and Data.

All data related to a contact is stored in this generic data table with each row telling what is the data it stores through its MIME type. So we could have a Phone.CONTENT_ITEM_TYPE as the MIME type of the data row, it contains Phone data. Similarly, if we have Email.CONTENT_ITEM_TYPE as the row’s MIME type, then it stores email data. Like this lot of data rows are associated with a single Raw Contact.

Each Raw Contact refers to a specific contact’s data coming from one single source – say, you gmail account or your office Microsoft account.

The Contact is the topmost in the hierarchy which aggregates similar looking data from various sources into one single contact – a very handy feature when you have redundant data coming about the same contact from you various accounts – like a facebook account, orkut account, yahoo account and goggle account.  So the hierarchy looks like this:
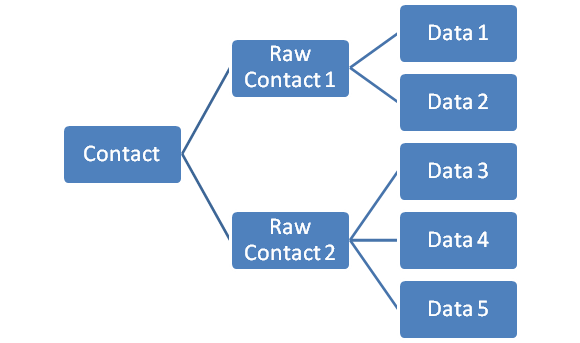
So, when we want to insert a new contact, we always insert a Raw Contact. When we want to update an existing contact, we most often deal with the data tables which are accessible through a series of CommonDataKind classes. Because this would be to update particular types of data like phone or email.
Coming to the example:

I create an activity with four buttons to View, Add, Modify and Delete Contacts.

           Button view = (Button)findViewById(R.id.viewButton);
            Button add = (Button)findViewById(R.id.createButton);
            Button modify = (Button)findViewById(R.id.updateButton);
            Button delete = (Button)findViewById(R.id.deleteButton);
           
           
            view.setOnClickListener(new OnClickListener() {
                  public void onClick(View v){
                        displayContacts();
                        Log.i("NativeContentProvider", "Completed Displaying Contact list");
                  }
            });

On the click of each of the buttons I invoke their respective methods: like displayContacts(), createContact(), updatecContact() and deleteContact(). We will now see each of these methods.

displayContacts() is pretty straightforward. Access to each of the tables mentioned above is through a content URI. I use the topmost level ‘Contacts’ URI to iterate through all the existing contacts and display their names and phone numbers (Toast them).

We know Contacts is a ContentProvider and hence we need to query through a ContentResolver which returns all the data of the contacts.

   private voiddisplayContacts() {
     
      ContentResolver cr = getContentResolver();
        Cursor cur = cr.query(ContactsContract.Contacts.CONTENT_URI,
                null, null, null, null);
        if (cur.getCount() > 0) {
            while (cur.moveToNext()) {
                  String id = cur.getString(cur.getColumnIndex(ContactsContract.Contacts._ID));
                  String name = cur.getString(cur.getColumnIndex(ContactsContract.Contacts.DISPLAY_NAME));
                  if (Integer.parseInt(cur.getString(
                        cur.getColumnIndex(ContactsContract.Contacts.HAS_PHONE_NUMBER))) > 0) {
                     Cursor pCur = cr.query(
                               ContactsContract.CommonDataKinds.Phone.CONTENT_URI,
                               null,
                               ContactsContract.CommonDataKinds.Phone.CONTACT_ID +" = ?",
                               new String[]{id}, null);
                     while (pCur.moveToNext()) {
                         String phoneNo = pCur.getString(pCur.getColumnIndex(ContactsContract.CommonDataKinds.Phone.NUMBER));
                         Toast.makeText(NativeContentProvider.this, "Name: " + name + ", Phone No: " + phoneNo, Toast.LENGTH_SHORT).show();
                     }
                    pCur.close();
                }
            }
        }
    }

I will try to briefly explain the above method.  Line 1 gets a handle to the ContentResolver. Line 2 queries the Contacts URI (ContactsContract.Contacts.CONTENT_URI ) without any mention of the specific columns or “where” clause of an SQL query. Notice all the 4 parameters are null. This means that we are not making any conditional query into the contacts table and hence all data is returned into the cursor.

Next, I check that the cursor is not empty and iterate through the cursor data. I retrieve the _ID and DISPLAY_NAME from the Contacts and then, I check for the flag if the contact has a phone number. This information is available in contacts table itself. But the Phone number details are in the data tables. Hence after checking for the flag, I query the CommonDataKings.Phone.CONTENT_URI for the phone data of that specific ID. From this new cursor named pCur, I retrieve the Phone Number. If there are multiple phone number for one contact, all of them will be retrieved and toasted one after another.
Now, let us see how to create or insert a new contact.

In the createContact() method which is called when you click on the “Add Contact” button, I first query to see if the hardcoded name “Sample Name” already exists. If so, I toast a message stating the same. If not, then I get into actually inserting the name along with a phone number. The first part of the check you can view in the complete source code available for download. Only the second part of inserting a contact is explained here. For this, we need to use a ContentResolveralways.

A ContentResolverprovides an applyBatch(…) method which takes an array of ContentProviderOperation classes as a parameter. All the data built into the ContentProviderOperations are committed or inserted into the ContentProvider that we are working on. IN this case, the ContentProvider we are working on are Contacts and the authority associated with the same is ContactsContract.AUTHORITY

Here is the code for the same:

        ArrayList<ContentProviderOperation> ops = newArrayList<ContentProviderOperation>();
        ops.add(ContentProviderOperation.newInsert(ContactsContract.RawContacts.CONTENT_URI)
                .withValue(ContactsContract.RawContacts.ACCOUNT_TYPE, "accountname@gmail.com")
                .withValue(ContactsContract.RawContacts.ACCOUNT_NAME, "com.google")
                .build());
        ops.add(ContentProviderOperation.newInsert(ContactsContract.Data.CONTENT_URI)
                .withValueBackReference(ContactsContract.Data.RAW_CONTACT_ID, 0)
                .withValue(ContactsContract.Data.MIMETYPE,
                        ContactsContract.CommonDataKinds.StructuredName.CONTENT_ITEM_TYPE)
                .withValue(ContactsContract.CommonDataKinds.StructuredName.DISPLAY_NAME, name)
                .build());
        ops.add(ContentProviderOperation.newInsert(ContactsContract.Data.CONTENT_URI)
                .withValueBackReference(ContactsContract.Data.RAW_CONTACT_ID, 0)
                .withValue(ContactsContract.Data.MIMETYPE,
                        ContactsContract.CommonDataKinds.Phone.CONTENT_ITEM_TYPE)
                .withValue(ContactsContract.CommonDataKinds.Phone.NUMBER, phone)
                .withValue(ContactsContract.CommonDataKinds.Phone.TYPE, ContactsContract.CommonDataKinds.Phone.TYPE_HOME)
                .build());

       
        try {
                  cr.applyBatch(ContactsContract.AUTHORITY, ops);
….

In the first element in the ops array, I am setting the details of the account to which I want to add the contact. In this case the gmail account type is accontname@gmail.com and the account name is “com.google”. The latter has to be unique and hence it is recommended to use the internet URLs of the source of data.

In the second element, I am adding the name of the contact and in the third the phone data. You notice that I use .withValueBackReference(..) as we still have not created the Raw contact and hence we do not have the Id. The first row creates the id and hands over the id to the next rows of data. 
This array ops is passed into the ContentResolverand thus the data is inserted.

For updating the phone number of an existing contact, I again use the ContentResolverwith the ContentProviderOperation array. However, now, I pass the where clause and the parameters of the where clause – specifically indicating that only the phone number of the “Sample Name” contact has to be updated.
            ops.add(ContentProviderOperation.newUpdate(ContactsContract.Data.CONTENT_URI)
                    .withSelection(where, params)
                    .withValue(ContactsContract.CommonDataKinds.Phone.DATA, phone)
                    .build());

Notice the .withSelection(where, params). The where and params look like this:

        String where = ContactsContract.Data.DISPLAY_NAME + " = ? AND " +
                        ContactsContract.Data.MIMETYPE + " = ? AND " +
                        String.valueOf(ContactsContract.CommonDataKinds.Phone.TYPE) + " = ? ";
       
String[] params = new String[] {name,
                  ContactsContract.CommonDataKinds.Phone.CONTENT_ITEM_TYPE,
                  String.valueOf(ContactsContract.CommonDataKinds.Phone.TYPE_HOME)};

Delete too is done in a very similar manner with no values but only the selection criteria is provided for which contact to be deleted.

      ContentResolver cr = getContentResolver();
      String where = ContactsContract.Data.DISPLAY_NAME + " = ? ";
      String[] params = new String[] {name};
   
        ArrayList<ContentProviderOperation> ops = newArrayList<ContentProviderOperation>();
        ops.add(ContentProviderOperation.newDelete(ContactsContract.RawContacts.CONTENT_URI)
              .withSelection(where, params)
              .build());
        try {
                  cr.applyBatch(ContactsContract.AUTHORITY, ops);
            } catch (RemoteException e) {
….


I really scouted the internet a lot to find a comprehensive tutorial on the new Contacts Content Provider API but could not find anything that easily. Hope this helps all who of you who are looking for the same.

NOTE: Many have been asking me questions on why the contacts that have just been added through this app are not visible in the phone contacts. All your contacts on phone are linked to your google account on the phone. However, the contacts from the above code have got added to psuedo google account and hence will not be visible directly. You search for the just added contact and you will be able to find it.


Hope this helps.

Sunday, May 8, 2011

Context Menu | Android Developer Tutorial


This is a follow up to the Options Menu Tutorial shared earlier.

To recap, the Context Menu is a floating list of menu items that appears when a user touches and holds a particular item displayed in the view, which has a menu associated with it.

Going straight to the example, first I create a ListViewwith names of pens displayed. When one presses and holds one of the names for a long time, the context menu appears as shown here:

And when you click on any of the context menu shown above, the screen that appears is:

Let’s go to the code.

First, the mundane step of creating a Listview(you can see the ListView tutorial for more explanation on this).  
I create a class ShowContextMenuextending the ListActivity. In its OnCreate(…) method, I associate the Listview array with the ListAdapater as shown here:

public class ShowContextMenu extends ListActivity {
     

    /** Called when the activity is first created. */
    @Override
    public voidonCreate(Bundle savedInstanceState) {
        super.onCreate(savedInstanceState);

        setListAdapter(new ArrayAdapter<String>(this,
                android.R.layout.simple_list_item_1, getResources().getStringArray(R.array.names)));

…       
    }

Note that instead of hard-coding the list items as string array within the class, I have followed the best practice of externalizing the strings into a strings.xml resource class. Hence I use getResources().getStringArray(R.array.names) to retrieve the array of pen names that I want to display in the List.  The strings.xml file in the value folder has this entry:

<string-array name="names">
      <item>MONT Blanc</item>
      <item>Gucci</item>
      <item>Parker</item>
      <item>Sailor</item>
      <item>Porsche Design</item>
      <item>Rotring</item>
      <item>Sheaffer</item>
      <item>Waterman</item>
</string-array>

Once this Listview has been created, now we want to associate a ContextMenu with each of the rows in the Listview Item. i.e. is a user were to long-press one of the items, a menu should appear. For this we add the following line as well in the onCreate(..) method.
registerForContextMenu(getListView());

But how do we create the ContextMenu? Whenever the long-press happens, the onCreateContextMenu(…) method is invoked. So, we need to override this method as shown below:

    public voidonCreateContextMenu(ContextMenu menu, View v, ContextMenuInfo menuInfo) {
      super.onCreateContextMenu(menu, v, menuInfo);
      MenuInflater inflater = getMenuInflater();
      inflater.inflate(R.menu.context_menu, menu);
    }

Here again, just as in Options Menu tutorial, I use a MenuInflater to create the context menu rather than do it programmatically. This is certainly a best practice of keeping the concerns separated. The View and the programming logic are kept separate as meant to be in Android Programming.  The context menu consists of 4 items – Edit, Save, Delete, View. So, here is how it is defined in the context_menu.xml in the res/menu folder:

<menu
  xmlns:android="http://schemas.android.com/apk/res/android">
      <item android:id="@+id/edit"
              android:title="@string/edit" />
      <item android:id="@+id/save"
            android:title="@string/save" />
      <item android:id="@+id/delete"
            android:title="@string/delete" />
      <item android:id="@+id/view"
            android:title="@string/view" />
</menu>

I have an id that is associated with each of the menu items that uniquely identifies the menu item selected. And I have a String associated with it which is what is displayed on the Menu.

Now that the context menu is created, how to handle when the menu item is clicked? For this we need to override the onContextItemSelected(…) method as shown below;

    public boolean onContextItemSelected(MenuItem item) {
      AdapterContextMenuInfo info = (AdapterContextMenuInfo) item.getMenuInfo();
      String[] names = getResources().getStringArray(R.array.names);
      switch(item.getItemId()) {
      case R.id.edit:
            Toast.makeText(this, "You have chosen the " + getResources().getString(R.string.edit) +
                        " context menu option for " + names[(int)info.id],
                        Toast.LENGTH_SHORT).show();
            return true;
      …………………..
      default:
            return super.onContextItemSelected(item);
      }

This is the callback method invoked when a context menu item is clicked. The callback get the reference to the clicked menu item as the parameter item.

I use the method item.getItemId() to retrieve the id of the item clicked. This is the same id that is defined in context_menu.xml. So, based on the id, I used a switch statement to jump to the appropriate action. Here the action is just to toast a message that tell which context menu was clicked for which ListView item. How do I retrieve the ListView item clicked?

Extra information about the menu is returned by calling item.getMenuInfo().  Info.id would be the ListView id. I use this id to retrieve the name of the pen  as in names[(int)info.id]

That is it. Do you want the complete code? Here it is.

Saturday, May 7, 2011

Options Menu | Android Developer Tutorial

Almost every application will need a menu in order to facilitate a user to perform actions on the application. In Android there are three types of menus possible.

  1. Options Menu
  2. Context Menu
  3. Sub Menu

The Options menu is the one that appears when a user touches the menu button on the mobile. This is something that is associated with an activity.  In 3.0 and later, this is available in the Action Bar itself for quick access.

In this article, I am showing how to create an Options Menu for devices having Android 2.3 or below.

The Context Menu is a floating list of menu items that appears when a user touches and holds a particular item displayed in the view, which has a menu associated with it.

The Sub Menu is a floating list of menu items that appears when the user touches a menu item that contains a nested menu.

There are two ways of creating an Options Menu in your application. One is by instantiating the Menu class and the other is by inflating a Menu from an XML menu resource.  Based on best practices it is always better to define the Menu in an XML and inflate it in your code.

Now, let us start with the example.

I am going to just define 3 menu items in the XML. Inflate it in my code. And when a user clicks on any of the menu items, I just Toast a message on what has been clicked.

NOTE: This is as usual not a practically useful piece, but sticking to my style, I want to keep it as uncluttered and as simple as possible so that the learning happens easily. And the focus is only on what concept we are trying to learn.

So, here is my options_menu.xml that is created in the res/menu folder:

<?xml version="1.0" encoding="utf-8"?>
<menu xmlns:android="http://schemas.android.com/apk/res/android">
      <item android:id="@+id/next"
              android:icon="@drawable/ic_next"
              android:title="@string/next" />
      <item android:id="@+id/previous"
            android:icon="@drawable/ic_previous"
            android:title="@string/previous" />
      <item android:id="@+id/list"
            android:icon="@drawable/ic_list"
            android:title="@string/list" /> 
</menu>

You see that the Menu root node consists of 3 item leaf nodes. Each of the items consists of an idicon and title. The resource id is unique to that item and it allows the application to recognize which item has been clicked by the user. The icon is a drawable that should exist in the res/drawable folder and is the one shown in the menu item. The string is the item’s title.

The above assumes that you have three images ic_next, ic_previous and ic_list copied into the drawable folder. It goes without saying that these image sizes should be kept as small as possible.
Once this is ready, we will create a class called ViewOptionsMenu. It’s onCreate(…) method would be a simple one calling the super method and displaying the content as shown below.

    public void onCreate(Bundle savedInstanceState) {
        super.onCreate(savedInstanceState);
            setContentView(R.layout.main);
    }

The main.xml just shows the message: “Click on the Options Menu to view the available Menu Options”.  This message as per the norm is defined in the strings.xml file that exists in the res/values folder. Here are the contents of the main.xml

<?xml version="1.0" encoding="utf-8"?>
<LinearLayout xmlns:android="http://schemas.android.com/apk/res/android"
    android:orientation="vertical"
    android:layout_width="fill_parent"
    android:layout_height="fill_parent"
    >
<TextView 
    android:layout_width="fill_parent"
    android:layout_height="wrap_content"
    android:text="@string/welcome"
    android:textSize="20sp" android:textStyle="bold" android:capitalize="none" android:typeface="sans"/>
</LinearLayout>

Now, I need to override the method:  onCreateOptionsMenu(Menu menu). This method is called by Android the first time the activity is loaded. This is so for Android 2.3 and below.  Here is the code:

    public boolean onCreateOptionsMenu(Menu menu) {
      MenuInflater inflater = getMenuInflater();
      inflater.inflate(R.menu.options_menu, menu);
      return true;
    }

This method is getting a handle to the MenuInflater and using it to inflate the options menu that we have defined earlier in options_menu.xml in the res/menu folder.  That is it. The Menu is created. Isn’t is so simple?

Now, that the menu is created, how do we respond to the user when he clicks on the menu. This is done by overriding the onOptionsItemSelected(MenuItem item) method in the Activity itself as shown below:

public boolean onOptionsItemSelected(MenuItem item) {
      switch (item.getItemId()) {
      case R.id.next:
            Toast.makeText(this"You have chosen the " + getResources().getString(R.string.next) + " menu option",
                        Toast.LENGTH_SHORT).show();
            return true;
      
      default:
            return super.onOptionsItemSelected(item);
      }

Here, the Android system calls this method by passing a handle to the MenuItem that has been clicked by the user. So, within this method, I check which item has been clicked by retrieving the item id through item.getItemId().  Then I use the switch statement to take action based on the id. If it is R.id.next that has been selected, then we toast a message that the “Next” menu option has been selected. In real apps, it is here that you can call the appropriate method that should take action according to the menu clicked.

Similarly I toast messages for “previous” as well as “list” menus. The complete code is downloadable here.

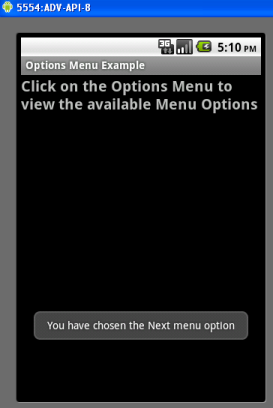
See the images below for how the options menu appears
 and what happens when you click on the options menu:
The whole of options menu works slightly differently for Android 3.0 and above.

And if you want to change the menu options, at runtime, you must override the onPrepareMenuOptions() method. This is called by Android each time the user clicks on the menu. This is useful for enabling, disabling, adding or removing menu items based on the current state of your application. 


Monday, April 18, 2011

Android Developers Blog: Can I use this Intent?

We all know that the loose coupling provided by Android through intents is one of its most powerful features. It makes it possible for us to mix and match the use of activities between various applications as though they all belong to one.

However, when I want to invoke another application that has published an intent filter, I cannot always assume that the other application is available on the phone. So, I need to check its availability and then only enable the feature to call it.

This is very well explained in the link: Android Developers Blog: Can I use this Intent?