Showing posts with label Android Tutorials. Show all posts

Thursday, November 24, 2011

Basic WebView


On Android we can build what are called Hybrid Apps. i.e. apps that have both HTML pages as well as native activities co-existing. There is a lot of debate on which is the way to develop for mobiles – HTML5 or native? Each of these have their own pros and cons. I will not go into those now. However, to be able to embed HTML pages into your app, one of the ways is through the use of a WebVew component.
Here I will share with you a very simple example of building a WebViewApp. This is nothing too different from what you see in the google resources pages. However, the intention here is to move from this basic level to a little more advanced level of interacting from the HTML page with Native Apps – integrating through JavaScript. That will be in the next tutorial, in keeping with my principle of explaining one thing at a time.

Also, for this example you will also need to have a webserver that serves you some HTML pages that can be invoked through your WebView. As an addendum to this article, you will find how to create a small web server app in your local environment.

Now, what is a WebView? Google documentation beautifully explains it as
 “A View that displays web pages. This class is the basis upon which you can roll your own web browser or simply display some online content within your Activity. It uses the WebKit rendering engine to display web pages and includes methods to navigate forward and backward through a history, zoom in and out, perform text searches and more.”

Let’s create a WebViewwhich should display your home Page, on loading. In the main class of the project here is the code in the onCreate() method:

  public void onCreate(Bundle savedInstanceState) {
        Log.i(TAG, "Entering onCreate");
        super.onCreate(savedInstanceState);
        setContentView(R.layout.webview);
       
        mWebView = (WebView)findViewById(R.id.webview);
        mWebView.clearCache(true);
        mWebView.getSettings().setJavaScriptEnabled(true);
       mWebView.loadUrl("http://10.0.2.2:8080/SampleWebServer/Welcome.html");
        Log.i(TAG,"Exiting onCreate");
}    

It is simple and straight forward. I have defined a WebViewin the layout folder as below (file name webview.xml)

<LinearLayout xmlns:android="http://schemas.android.com/apk/res/android"
      android:layout_width="fill_parent"
      android:layout_height="fill_parent">
            <WebView
                android:id="@+id/webview"
                android:layout_width="fill_parent"
                android:layout_height="wrap_content"
                  android:scrollbarStyle="outsideOverlay"
                  android:scrollbarFadeDuration="5"
                  android:fillViewport="true"/>

</LinearLayout>

I get a handle to the WebViewin this line: mWebView = (WebView)findViewById(R.id.webview);
And then I load the local URL in this line       mWebView.loadUrl("http://10.0.2.2:8080/SampleWebServer/Welcome.html");

As simple as this. What this does is that it invokes the default android browser if we have links on the welcome page as shown below: (we have gone out of the WebViewinto a browser app)
 

If we want to be able to continue opening in the WebView, here is the piece of code that would help. Basically we are writing out own custom browser by extending the WebViewClient:

  private classWebViewSampleClient extends WebViewClient{
       
        @Override
        public boolean shouldOverrideUrlLoading(WebView view, String url) {
            view.loadUrl(url);  
           
            return true;
        }
       
  }

Here we are telling to load the passed URL into the WebViewby overriding the shoudlOverrideUrlLoading method of the WebViewClient.

After overriding the same, add another piece of code into onCreate() method:
mWebView.setWebViewClient(new WebViewSampleClient());
after mWebView.loadUrl("http://10.0.2.2:8080/SampleWebServer/Welcome.html");

Now when you click on the Second Page link, the new HTML page gets invoked within the WebViewas shown below:


From here, if you press a back button, you will log out of the app, since WebViewis one activity and the pages are all opened within the WebView. In order to override that behavior and you want to navigate back to the HomePage within the WebView.

    @Override
    public boolean onKeyDown(int keyCode, KeyEvent event) {
        if ((keyCode == KeyEvent.KEYCODE_BACK) && mWebView.canGoBack()) {
            mWebView.goBack();
            return true;
        }
        return super.onKeyDown(keyCode, event);
       
    }

The code is pretty self explanatory. When a back button is clicked and there is something within the WebViewthat we can go back it, do it within the WebView.  Here is the complete code for download.

Last but not the least, I have also added <uses-permission android:name="android.permission.INTERNET" /> into the AndroidManifest file as this app will use the internet to invoke the http based URL.

To create a Web Server and host HTML pages, please see this tutorial.

NOTE: any webserver running locally can be accessed through http protocol using the IP address 127.0.0.1 or localhost or the actual IP address which you get when you run IP address command at the command prompt. However, within the emulator, the linux kernel takes the localhost as 10.0.2.2. and hence you will see in the code above that this IP address is used.

Tuesday, May 17, 2011

Contacts API 2.0 and above | Android Developer Tutorial


Starting from Android 2.0 (API Level 5), the Android platform provides an improved Contacts API for managing and integrating contacts from multiple accounts and from other data sources. To handle overlapping data from multiple sources, the contacts content provider aggregates similar contacts and presents them to users as a single entity. This article describes how to use the new API to manage (insert, update, delete, view) contacts.

The new Contacts API is defined in the android.provider.ContactsContract and related classes. The older API is still supported, although deprecated.

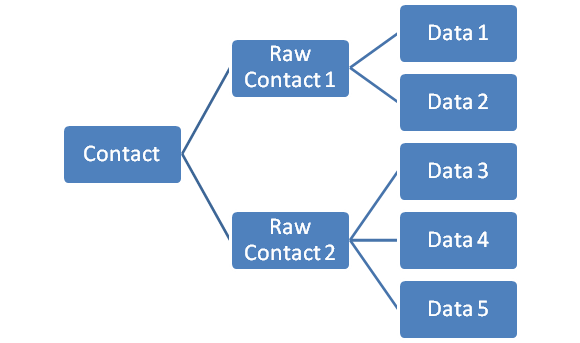
We need to understand the underlying structure of storage to better manipulate the contacts. We have three distinct types of tables – Contacts, Raw Contacts and Data.

All data related to a contact is stored in this generic data table with each row telling what is the data it stores through its MIME type. So we could have a Phone.CONTENT_ITEM_TYPE as the MIME type of the data row, it contains Phone data. Similarly, if we have Email.CONTENT_ITEM_TYPE as the row’s MIME type, then it stores email data. Like this lot of data rows are associated with a single Raw Contact.

Each Raw Contact refers to a specific contact’s data coming from one single source – say, you gmail account or your office Microsoft account.

The Contact is the topmost in the hierarchy which aggregates similar looking data from various sources into one single contact – a very handy feature when you have redundant data coming about the same contact from you various accounts – like a facebook account, orkut account, yahoo account and goggle account.  So the hierarchy looks like this:
So, when we want to insert a new contact, we always insert a Raw Contact. When we want to update an existing contact, we most often deal with the data tables which are accessible through a series of CommonDataKind classes. Because this would be to update particular types of data like phone or email.
Coming to the example:

I create an activity with four buttons to View, Add, Modify and Delete Contacts.

           Button view = (Button)findViewById(R.id.viewButton);
            Button add = (Button)findViewById(R.id.createButton);
            Button modify = (Button)findViewById(R.id.updateButton);
            Button delete = (Button)findViewById(R.id.deleteButton);
           
           
            view.setOnClickListener(new OnClickListener() {
                  public void onClick(View v){
                        displayContacts();
                        Log.i("NativeContentProvider", "Completed Displaying Contact list");
                  }
            });

On the click of each of the buttons I invoke their respective methods: like displayContacts(), createContact(), updatecContact() and deleteContact(). We will now see each of these methods.

displayContacts() is pretty straightforward. Access to each of the tables mentioned above is through a content URI. I use the topmost level ‘Contacts’ URI to iterate through all the existing contacts and display their names and phone numbers (Toast them).

We know Contacts is a ContentProvider and hence we need to query through a ContentResolver which returns all the data of the contacts.

   private voiddisplayContacts() {
     
      ContentResolver cr = getContentResolver();
        Cursor cur = cr.query(ContactsContract.Contacts.CONTENT_URI,
                null, null, null, null);
        if (cur.getCount() > 0) {
            while (cur.moveToNext()) {
                  String id = cur.getString(cur.getColumnIndex(ContactsContract.Contacts._ID));
                  String name = cur.getString(cur.getColumnIndex(ContactsContract.Contacts.DISPLAY_NAME));
                  if (Integer.parseInt(cur.getString(
                        cur.getColumnIndex(ContactsContract.Contacts.HAS_PHONE_NUMBER))) > 0) {
                     Cursor pCur = cr.query(
                               ContactsContract.CommonDataKinds.Phone.CONTENT_URI,
                               null,
                               ContactsContract.CommonDataKinds.Phone.CONTACT_ID +" = ?",
                               new String[]{id}, null);
                     while (pCur.moveToNext()) {
                         String phoneNo = pCur.getString(pCur.getColumnIndex(ContactsContract.CommonDataKinds.Phone.NUMBER));
                         Toast.makeText(NativeContentProvider.this, "Name: " + name + ", Phone No: " + phoneNo, Toast.LENGTH_SHORT).show();
                     }
                    pCur.close();
                }
            }
        }
    }

I will try to briefly explain the above method.  Line 1 gets a handle to the ContentResolver. Line 2 queries the Contacts URI (ContactsContract.Contacts.CONTENT_URI ) without any mention of the specific columns or “where” clause of an SQL query. Notice all the 4 parameters are null. This means that we are not making any conditional query into the contacts table and hence all data is returned into the cursor.

Next, I check that the cursor is not empty and iterate through the cursor data. I retrieve the _ID and DISPLAY_NAME from the Contacts and then, I check for the flag if the contact has a phone number. This information is available in contacts table itself. But the Phone number details are in the data tables. Hence after checking for the flag, I query the CommonDataKings.Phone.CONTENT_URI for the phone data of that specific ID. From this new cursor named pCur, I retrieve the Phone Number. If there are multiple phone number for one contact, all of them will be retrieved and toasted one after another.
Now, let us see how to create or insert a new contact.

In the createContact() method which is called when you click on the “Add Contact” button, I first query to see if the hardcoded name “Sample Name” already exists. If so, I toast a message stating the same. If not, then I get into actually inserting the name along with a phone number. The first part of the check you can view in the complete source code available for download. Only the second part of inserting a contact is explained here. For this, we need to use a ContentResolveralways.

A ContentResolverprovides an applyBatch(…) method which takes an array of ContentProviderOperation classes as a parameter. All the data built into the ContentProviderOperations are committed or inserted into the ContentProvider that we are working on. IN this case, the ContentProvider we are working on are Contacts and the authority associated with the same is ContactsContract.AUTHORITY

Here is the code for the same:

        ArrayList<ContentProviderOperation> ops = newArrayList<ContentProviderOperation>();
        ops.add(ContentProviderOperation.newInsert(ContactsContract.RawContacts.CONTENT_URI)
                .withValue(ContactsContract.RawContacts.ACCOUNT_TYPE, "accountname@gmail.com")
                .withValue(ContactsContract.RawContacts.ACCOUNT_NAME, "com.google")
                .build());
        ops.add(ContentProviderOperation.newInsert(ContactsContract.Data.CONTENT_URI)
                .withValueBackReference(ContactsContract.Data.RAW_CONTACT_ID, 0)
                .withValue(ContactsContract.Data.MIMETYPE,
                        ContactsContract.CommonDataKinds.StructuredName.CONTENT_ITEM_TYPE)
                .withValue(ContactsContract.CommonDataKinds.StructuredName.DISPLAY_NAME, name)
                .build());
        ops.add(ContentProviderOperation.newInsert(ContactsContract.Data.CONTENT_URI)
                .withValueBackReference(ContactsContract.Data.RAW_CONTACT_ID, 0)
                .withValue(ContactsContract.Data.MIMETYPE,
                        ContactsContract.CommonDataKinds.Phone.CONTENT_ITEM_TYPE)
                .withValue(ContactsContract.CommonDataKinds.Phone.NUMBER, phone)
                .withValue(ContactsContract.CommonDataKinds.Phone.TYPE, ContactsContract.CommonDataKinds.Phone.TYPE_HOME)
                .build());

       
        try {
                  cr.applyBatch(ContactsContract.AUTHORITY, ops);
….

In the first element in the ops array, I am setting the details of the account to which I want to add the contact. In this case the gmail account type is accontname@gmail.com and the account name is “com.google”. The latter has to be unique and hence it is recommended to use the internet URLs of the source of data.

In the second element, I am adding the name of the contact and in the third the phone data. You notice that I use .withValueBackReference(..) as we still have not created the Raw contact and hence we do not have the Id. The first row creates the id and hands over the id to the next rows of data. 
This array ops is passed into the ContentResolverand thus the data is inserted.

For updating the phone number of an existing contact, I again use the ContentResolverwith the ContentProviderOperation array. However, now, I pass the where clause and the parameters of the where clause – specifically indicating that only the phone number of the “Sample Name” contact has to be updated.
            ops.add(ContentProviderOperation.newUpdate(ContactsContract.Data.CONTENT_URI)
                    .withSelection(where, params)
                    .withValue(ContactsContract.CommonDataKinds.Phone.DATA, phone)
                    .build());

Notice the .withSelection(where, params). The where and params look like this:

        String where = ContactsContract.Data.DISPLAY_NAME + " = ? AND " +
                        ContactsContract.Data.MIMETYPE + " = ? AND " +
                        String.valueOf(ContactsContract.CommonDataKinds.Phone.TYPE) + " = ? ";
       
String[] params = new String[] {name,
                  ContactsContract.CommonDataKinds.Phone.CONTENT_ITEM_TYPE,
                  String.valueOf(ContactsContract.CommonDataKinds.Phone.TYPE_HOME)};

Delete too is done in a very similar manner with no values but only the selection criteria is provided for which contact to be deleted.

      ContentResolver cr = getContentResolver();
      String where = ContactsContract.Data.DISPLAY_NAME + " = ? ";
      String[] params = new String[] {name};
   
        ArrayList<ContentProviderOperation> ops = newArrayList<ContentProviderOperation>();
        ops.add(ContentProviderOperation.newDelete(ContactsContract.RawContacts.CONTENT_URI)
              .withSelection(where, params)
              .build());
        try {
                  cr.applyBatch(ContactsContract.AUTHORITY, ops);
            } catch (RemoteException e) {
….


I really scouted the internet a lot to find a comprehensive tutorial on the new Contacts Content Provider API but could not find anything that easily. Hope this helps all who of you who are looking for the same.

NOTE: Many have been asking me questions on why the contacts that have just been added through this app are not visible in the phone contacts. All your contacts on phone are linked to your google account on the phone. However, the contacts from the above code have got added to psuedo google account and hence will not be visible directly. You search for the just added contact and you will be able to find it.


Hope this helps.

Friday, February 18, 2011

ListView of Data from SQLiteDatabase - Android

This is a next level tutorial where I am mixing two concepts – The ListView concept that is explicitly explained in the ListView Tutorial and the SQLiteDB concept in into own tutorial.

Here I am intending to query a database using a SQLiteDatabase API. The results I obtain are in a Cursor object that I iterate and create an ArrayList that is passed to the ListView. Let us see the steps involved in this exercise:

In the onCreate(…) method I have 2 methods corresponding to the two steps described above:

openAndQueryDatabase();
       
      displayResultList();

Let us see what each of them does:

Here is the first step:

private void openAndQueryDatabase() {
            try {
                  DBHelper dbHelper = new DBHelper(this.getApplicationContext());
                  newDB = dbHelper.getWritableDatabase();
                  Cursor c = newDB.rawQuery("SELECT FirstName, Age FROM " +
                        tableName +
                        " where Age > 10 LIMIT 4", null);

            if (c != null ) {
                  if  (c.moveToFirst()) {
                        do {
                              String firstName = c.getString(c.getColumnIndex("FirstName"));
                              int age = c.getInt(c.getColumnIndex("Age"));
                              results.add("Name: " + firstName + ",Age: " + age);
                        }while (c.moveToNext());
                  }
            }                
            } catch (SQLiteException se ) {
            Log.e(getClass().getSimpleName(), "Could not create or Open the database");
        } finally {
            if (newDB != null)
                  newDB.execSQL("DELETE FROM " + tableName);
                  newDB.close();
        }

      }       

Now, DBHelper is a class I have written extending the SQLiteOpenHelper class. All that it does is create a database by name “sample”, create a table within it and insert values into the table. It does this if the database does not already exist.  The table name is “Resource” and the columns in the table are Lastname, Firstname, Country, Age.

The code for this example can be downloaded here and you can look into the DBHelper code as well (which I do not want to elaborate here)

So, from the DBHelper class we get an open database which we call the newDB. Using this handle, we query the table for values. To keep it simple, while retrieving values I have hard-coded the column names which need not be the case. So I run a rawQuery and get the results into a Cursor.

Next I iterate through the Cursorand populate the results into an ArrayList of Strings “result”.  In the finally block, I not only close the database but before that I delete all the entries inserted into the database by the DBHelper class just to clean up.

Next how do I display the results in a ListView. If you know ListView– how it works it is rather simple. Else you could look at the ListViewTutorial. Here is the method:

      private void displayResultList() {
            TextView tView = new TextView(this);
        tView.setText("This data is retrieved from the database and only 4 " +
                  "of the results are displayed");
        getListView().addHeaderView(tView);
       
        setListAdapter(new ArrayAdapter<String>(this,
                android.R.layout.simple_list_item_1, results));
        getListView().setTextFilterEnabled(true);
           
      }

The only additional bit I have done here is to add a HeaderView (which is using the concept of programming UI explained in another tutorial).

I have written this tutorial based on some of the requests in my blog. Hope this helps.